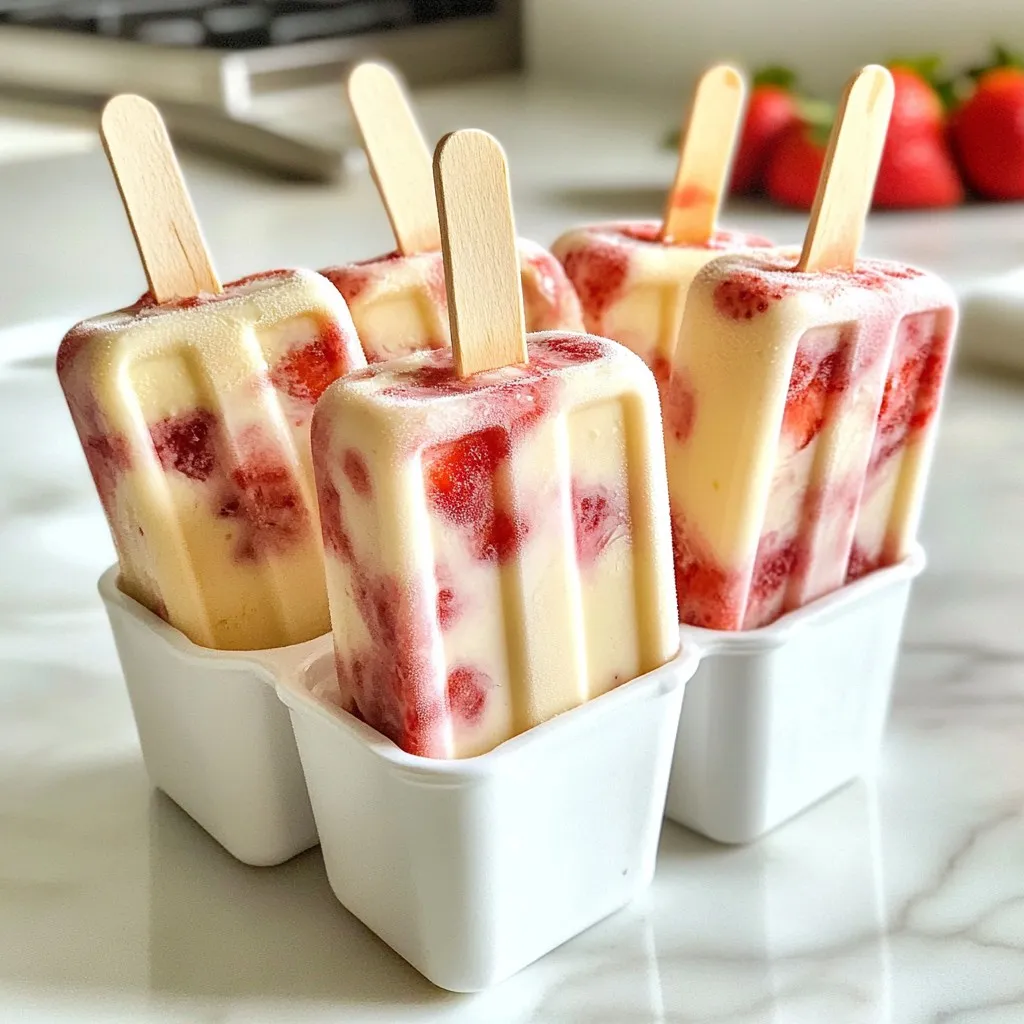
Beat the summer heat with my Strawberry Yogurt Swirl Popsicles! These tasty treats are easy to make and use fresh ingredients. You only need a few simple items like strawberries and Greek yogurt. In this post, I’ll guide you step-by-step through making these refreshing popsicles. Get ready to impress your friends and family with a fun, fruity snack that’s not just delicious but also healthy! Let’s dive in!
Why I Love This Recipe
- Fresh and Fruity: The combination of ripe strawberries and creamy yogurt creates a refreshing treat that’s perfect for hot days.
- Easy to Make: With just a few simple steps, you can whip up these popsicles in no time, making them a great choice for a quick dessert.
- Customizable: Feel free to adjust the sweetness or even add other fruits to suit your taste preferences and dietary needs.
- Healthy Indulgence: Packed with protein from Greek yogurt and antioxidants from strawberries, these popsicles are a guilt-free way to enjoy a sweet treat.
Ingredients
Fresh Ingredients
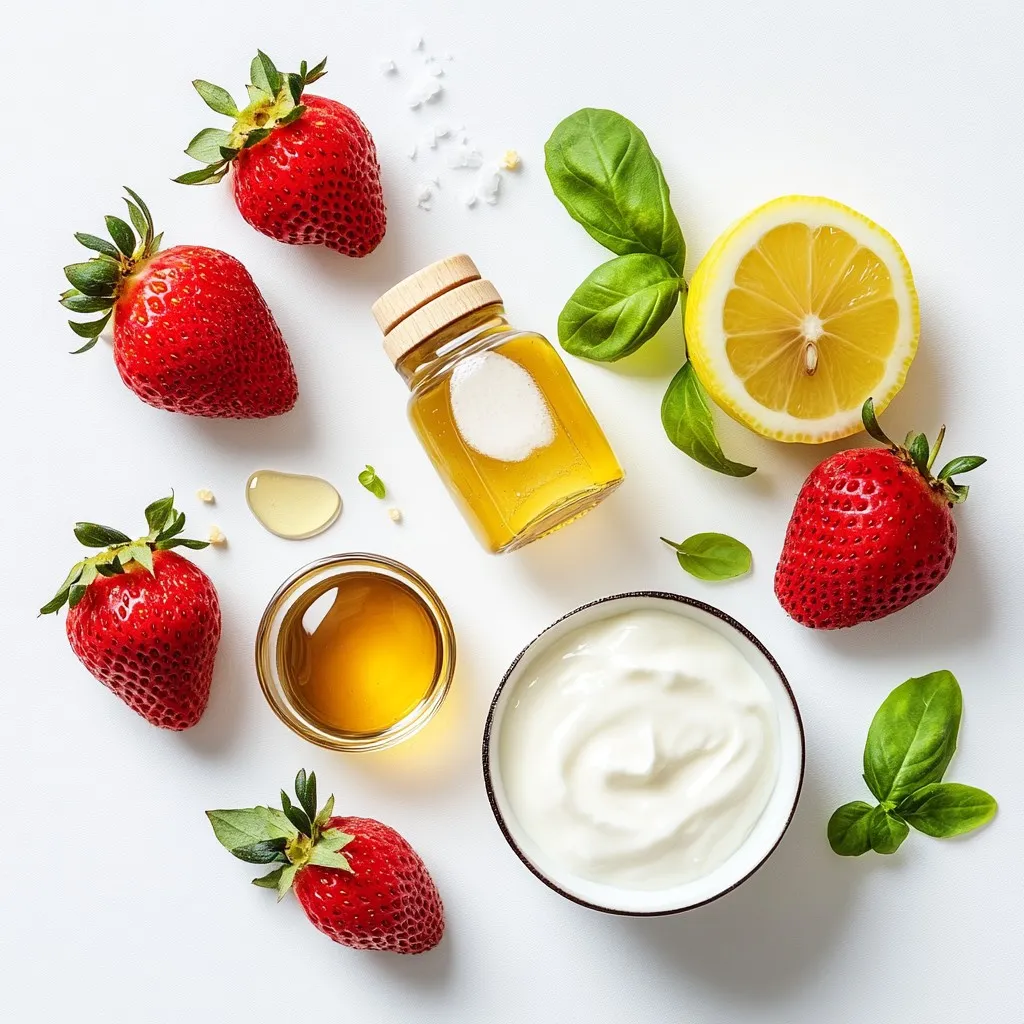
– 2 cups fresh strawberries, hulled and chopped
– 2 tablespoons honey or maple syrup
Strawberries are the star of this recipe. Choose ripe, sweet strawberries for the best taste. Hulling means removing the green leafy part at the top, making them ready for blending. You can add honey or maple syrup to adjust the sweetness.
Dairy Components
– 1 cup plain Greek yogurt
– 1 tablespoon vanilla extract
Greek yogurt brings a creamy base to these popsicles. It adds protein and a slight tang. The vanilla extract gives a lovely aroma and extra flavor.
Flavor Enhancers
– 1 tablespoon freshly squeezed lemon juice
– A pinch of salt
Lemon juice adds brightness and balances the sweetness. Just a pinch of salt enhances all the flavors. It makes the popsicles taste even better.
Step-by-Step Instructions
Preparing the Strawberry Puree
Start by placing your chopped strawberries in a blender. Add two tablespoons of honey or maple syrup. This adds sweetness based on your taste. Blend until the mixture is smooth. Set the puree aside for later.
Making the Yogurt Mixture
In a mixing bowl, combine one cup of plain Greek yogurt. Add one tablespoon of vanilla extract and one tablespoon of freshly squeezed lemon juice. Don’t forget a pinch of salt! Whisk everything until it’s creamy and well mixed. This mixture adds a rich flavor to the popsicles.
Assembling the Popsicles
Begin by pouring half of the strawberry puree into your popsicle molds. Fill them just enough to create an even layer. Next, add a generous layer of the yogurt mixture on top. Smooth it out so it looks nice. After that, pour the rest of the strawberry mixture over the yogurt layer.
To create a marbled effect, take a skewer or popsicle stick. Gently swirl it through the layers. Be careful not to mix them too much! Insert the popsicle sticks upright into the molds. Now, transfer the molds to your freezer. Freeze for at least 4 to 6 hours, or until the popsicles are firm.
When they are ready, run warm water over the outside of the molds for a few seconds. This helps loosen the popsicles, making removal easier. Enjoy your refreshing treat!
Tips & Tricks
Sweetness Adjustments
To modify sweetness, start by tasting the strawberry puree. If it’s too tart, add more honey or maple syrup. I like to use two tablespoons for a nice balance. For a lighter touch, you can cut down to one tablespoon. Remember, you can always add more, but you cannot take it out once mixed. This makes it easy to find your sweet spot.
Swirling Techniques
To create that stunning marbled look, use a skewer or popsicle stick. After layering the strawberry puree and yogurt, gently swirl it through both layers. Go slow! This helps keep the colors separate while still blending them slightly. A few swirls are enough to achieve a beautiful effect. The goal is to see both colors in each popsicle.
Serving Suggestions
When it’s time to serve, presentation matters! Place the popsicles on a bright plate. Garnish with fresh strawberry slices and a sprig of mint for a pop of color. This not only makes your dish look fancy but also adds a fresh taste. Your guests will love the effort you put into making the popsicles look as good as they taste.
Pro Tips
- Fresh Strawberries are Key: Use ripe, fresh strawberries for the best flavor. They should be bright red and fragrant, which indicates sweetness.
- Adjust Sweetness to Taste: Depending on the ripeness of your strawberries, you may need to adjust the amount of honey or maple syrup. Start with less and add more if needed.
- Layer for Visual Appeal: When layering the strawberry puree and yogurt, take your time to create distinct layers for a beautiful marbled effect.
- Effortless Removal: If you have trouble removing the popsicles from the molds, running warm water over the outside for a few seconds will help loosen them without melting.
Variations
Fruit Combinations
You can mix things up with different fruits. Instead of just strawberries, try blueberries, raspberries, or blackberries. You can also explore tropical fruits like mango or pineapple. Each choice adds a new twist. For example, mango brings a lovely sweetness. Mixing berries can give a nice tart flavor.
Yogurt Alternatives
If you want a dairy-free option, try coconut or almond yogurt. These options add a unique flavor and keep the popsicles creamy. For extra taste, pick flavored yogurt. You can use vanilla or even coconut-flavored yogurt. These choices can make your popsicles even more exciting.
Adding Mix-ins
Adding nuts or granola can give your popsicles a nice crunch. Chopped almonds or walnuts work well. A sprinkle of granola adds texture and flavor. You can mix these in with the yogurt or sprinkle them in the molds. This adds a fun surprise to each bite.
Storage Info
Freezing Guidelines
To keep your strawberry yogurt swirl popsicles fresh, follow these tips:
– Use airtight containers: After freezing, place popsicles in airtight bags or containers. This prevents freezer burn.
– Label and date: Always label your storage with the date. This helps track freshness.
– Freezing duration: These popsicles last about 1 to 2 months in the freezer. Enjoy them within this time for the best taste.
Thawing Tips
When ready to enjoy, here’s how to soften your popsicles:
– Room temperature: Let the popsicles sit out for about 5 minutes. This helps them soften.
– Warm water: Run warm water over the outside of the mold for about 10 seconds. This loosens them up quickly.
Resealing and Refreezing
If you have leftover popsicles, here’s what to do:
– Reseal carefully: If you thaw a popsicle and don’t eat it, wrap it tightly in plastic wrap. This helps keep it fresh.
– Refreezing: You can refreeze it, but know that the texture may change. The popsicle may become a bit icy. For best results, eat them fresh!
FAQs
Can I use frozen strawberries instead of fresh?
Yes, you can use frozen strawberries! They are often picked and frozen at their peak ripeness. This means they can taste just as good as fresh ones. Using frozen strawberries can be easier, too. Just blend them straight from the freezer. However, be aware that the texture may be a bit softer. This might change the final look of your popsicles. If you prefer a firmer texture, add a little less sweetener.
How long does it take for popsicles to freeze?
Popsicles usually take about 4 to 6 hours to freeze completely. For best results, aim for at least six hours. This ensures they are firm and easy to remove from the molds. If you are in a hurry, you can try freezing them for a shorter time. Just be careful; they may be too soft to hold their shape.
Can I make popsicles without molds?
Absolutely! You can use small cups or ice cube trays as molds. Just pour the mixture into your chosen containers. If you use cups, insert sticks once the mixture is a bit firm. This helps the sticks stay upright. You can also use silicone molds, which make it easier to pop the popsicles out. Be creative!
You learned how to craft tasty strawberry popsicles using fresh ingredients and simple steps. Start with blending strawberries and sweeteners. Then, mix yogurt with lemon and vanilla. Layer and freeze for a delicious treat.
Remember, you can adjust sweetness and try different fruits too. Store your popsicles right for lasting enjoyment. Enjoy your cool creations and impress friends and family with unique flavor