Craving a cool, healthy treat? Look no further! This Peanut Butter Banana Nice Cream is simple, delicious, and perfect for hot days. With just five easy ingredients, you can whip up a creamy dessert that feels like a scoop of ice cream but without the guilt. Join me as we blend, freeze, and scoop our way to tasty bliss. You’ll want to try this frozen delight!
Why I Love This Recipe
- Deliciously Creamy: This nice cream is incredibly smooth and creamy, making it a satisfying treat that feels indulgent yet healthy.
- Easy to Make: With just a few simple ingredients and quick preparation, this recipe is perfect for anyone looking for a fuss-free dessert.
- Nutritious Ingredients: Using ripe bananas and natural peanut butter, this nice cream is packed with nutrients and healthy fats, making it a guilt-free indulgence.
- Customizable: You can easily modify this recipe by adding your favorite mix-ins or toppings, allowing for endless variations to suit your taste.
Ingredients
Main Ingredients
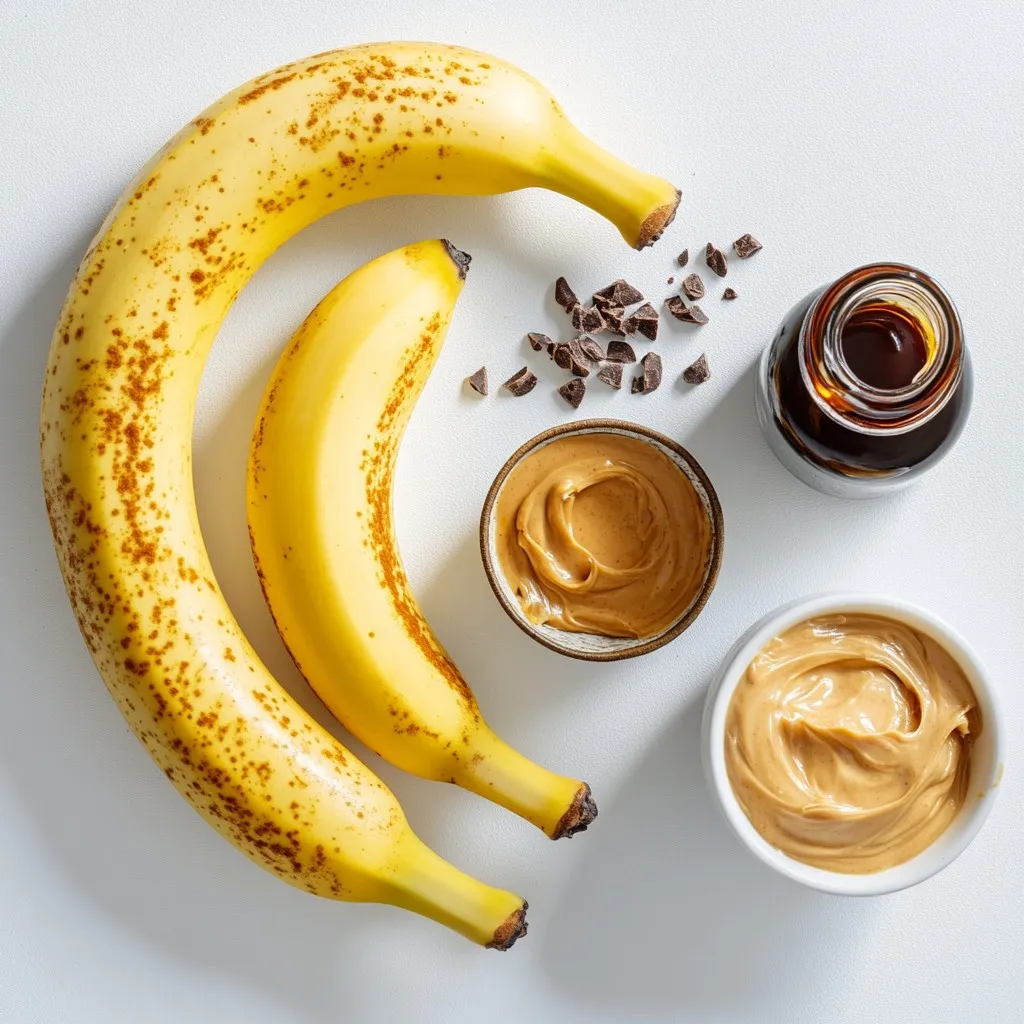
– 3 ripe bananas, peeled and sliced, then frozen
– 1/4 cup creamy peanut butter
– 1 tablespoon honey or maple syrup (optional)
– 1 teaspoon vanilla extract
– 1/4 cup almond milk (or your preferred milk)
– A pinch of sea salt
To make Peanut Butter Banana Nice Cream, gather these simple ingredients. The ripe bananas give the nice cream its sweet base. Freezing them helps create a creamy texture. The creamy peanut butter adds rich flavor and creaminess. If you want extra sweetness, honey or maple syrup works great. The vanilla extract brings a warm, inviting taste. Almond milk, or your favorite milk, thins the mixture just right. A pinch of sea salt balances the flavors. With these ingredients, you have a delicious treat that’s easy to make.
Step-by-Step Instructions
Preparing the Bananas
Let’s start by getting the bananas ready. Remove the frozen banana slices from the freezer. Let them sit at room temperature for about 5 minutes. This slight thawing helps them blend more smoothly. It makes a big difference in the texture of your nice cream.
Combining Ingredients
Next, grab your blender or food processor. Add the softened banana slices to it. Then, pour in the creamy peanut butter. If you like your nice cream sweeter, add honey or maple syrup. Don’t forget the vanilla extract and a pinch of sea salt. These flavors work together to create a tasty treat.
Achieving the Perfect Texture
Now comes the fun part: blending! Blend the mixture on high speed. You want it to become silky smooth and creamy. Sometimes, you may need to pause and scrape down the sides. If it looks too thick, slowly add almond milk. This will help you get the creaminess you want.
Optional Enhancements
After blending, take a small taste. If you want it sweeter, blend in a little more honey or maple syrup. This is your nice cream, so make it as sweet as you like!
Freezing and Serving
Once your mixture is perfectly blended, carefully transfer it to a freezer-safe container. Use a spatula to smooth the top. Seal the container tight, then place it in the freezer. Let it freeze for about 1 to 2 hours for a firmer texture. When it’s ready, scoop the nice cream into chilled bowls. Enjoy your cool and creamy treat!
Tips & Tricks
Achieving Creaminess
To get the best texture for your nice cream, thaw the bananas a bit. Frozen bananas blend better when they are not rock hard. Let them sit out for about five minutes. This little trick helps make your nice cream silky and smooth. If you skip this step, your blender may struggle, and you might not get the creamy texture you want.
Customizing Sweetness
You can change how sweet your nice cream is based on your taste. I like to start with one tablespoon of honey or maple syrup. If you want it sweeter, add a bit more. Always taste the mixture before you freeze it. This way, you can adjust to your liking. Remember, the ripeness of the bananas also affects sweetness. Riper bananas will add more natural sweetness.
Serving Suggestions
Presentation is key when serving nice cream. Use chilled bowls to keep it cool and creamy. Top each bowl with dark chocolate shavings or chopped nuts for extra flavor and crunch. You can also drizzle a bit of peanut butter on top. These simple touches make your nice cream look and taste even better!
Pro Tips
- Use Overripe Bananas: The riper the bananas, the sweeter and creamier your nice cream will be. Look for bananas with brown spots for the best flavor!
- Experiment with Nut Butters: While peanut butter is delicious, try using almond butter or cashew butter for a unique twist on your nice cream.
- Adjust Consistency: If you prefer a softer nice cream, enjoy it right after blending. For a firmer texture, let it freeze longer.
- Garnish Creatively: Enhance your presentation with fresh fruit, shredded coconut, or a drizzle of chocolate sauce for added flavor and visual appeal.
Variations
Flavor Combinations
You can make this nice cream even better by adding flavors.
– Cocoa Powder: Mix in 2 tablespoons of cocoa powder for a chocolate twist. This adds richness and depth.
– Berries: Blend in a cup of frozen berries for a fruity touch. Strawberries or blueberries work great.
Nut Butter Alternatives
If you’re not a fan of peanut butter, no worries!
– Almond Butter: Use almond butter for a nutty flavor. This option is smooth and creamy.
– Cashew Butter: Cashew butter offers a mild taste. It blends well and keeps it creamy.
Vegan Options
You can easily make this a vegan dish.
– Check Ingredients: Ensure you use maple syrup instead of honey. All other ingredients are already vegan-friendly. Enjoy a guilt-free treat!
Storage Info
Storing Nice Cream
To store your nice cream, use a freezer-safe container. Make sure to seal it tightly. This helps keep out air and prevents ice crystals. When you freeze nice cream, it may become harder. To avoid this, smooth the top before sealing. You can also press plastic wrap directly on the surface. This helps keep it creamy.
Shelf Life
Your peanut butter banana nice cream can stay fresh for up to two weeks in the freezer. After that, it may lose some flavor and texture. If you store it longer, check for ice crystals. These can affect the taste.
Reviving Texture
If your nice cream gets too hard, don’t worry! Take it out of the freezer and let it sit for about 5 to 10 minutes. This short thawing time helps bring back the creaminess. You can also blend it again. Add a splash of almond milk to help it smooth out. This will make it easy to scoop and enjoy!
FAQs
Can I use other fruits in this recipe?
Yes, you can! This nice cream is very flexible. You can swap bananas for other fruits. Here are some great options:
– Mango: For a tropical twist.
– Strawberries: For a fruity and fresh flavor.
– Peaches: For a sweet and juicy treat.
– Blueberries: For a burst of color and antioxidants.
Experimenting with these fruits can lead to new and exciting flavors!
Is this recipe suitable for meal prep?
Absolutely! This recipe is perfect for meal prep. You can make nice cream in advance and store it. Here’s how:
– Freeze bananas: Slice and freeze your bananas a day ahead.
– Blend and store: Prepare the nice cream and place it in a container.
– Quick desserts: Just scoop it out when you want a treat.
This way, you always have a sweet snack ready to go!
What is the best way to serve nice cream?
Serving nice cream is all about the details. Here are some tips:
– Optimal temperature: Let the nice cream sit for a minute before scooping. This makes it easier to serve.
– Chilled bowls: Use chilled bowls for a refreshing experience.
– Garnishes: Top with dark chocolate shavings or nuts for a nice look.
These tips will make your nice cream even more inviting and fun to eat!
This blog post covered how to make a delicious nice cream using just a few ingredients. We walked through preparing the bananas, blending them with peanut butter and other goodies, and freezing the mix. You can customize this treat with different flavors and toppings. I emphasize the importance of letting bananas thaw for creamy texture. Store your nice cream well for the best taste later. Enjoy this quick, fun, and tasty dessert that you can make anytim