Craving a quick, flavorful snack? You’re in the right place! These Jalapeño Cheddar Stuffed Pretzels are not just tasty—they’re easy to make at home. With warm cheddar, spicy jalapeños, and a soft, chewy exterior, they make the perfect treat for game day or movie night. Let’s dive into the ingredients and discover how to create this mouthwatering snack! You’ll impress your friends and family in no time!
Why I Love This Recipe
- Unique Flavor Combination: The spicy jalapeños paired with sharp cheddar create a flavor explosion that tantalizes the taste buds.
- Interactive Cooking Experience: Shaping the pretzels and filling them is a fun activity, making it perfect for family gatherings or cooking parties.
- Perfect for Any Occasion: These stuffed pretzels are great as appetizers, snacks, or even a main dish, making them versatile for any meal.
- A Crowd-Pleaser: With their golden brown appearance and delicious aroma, these pretzels are sure to impress guests at any gathering.
Ingredients
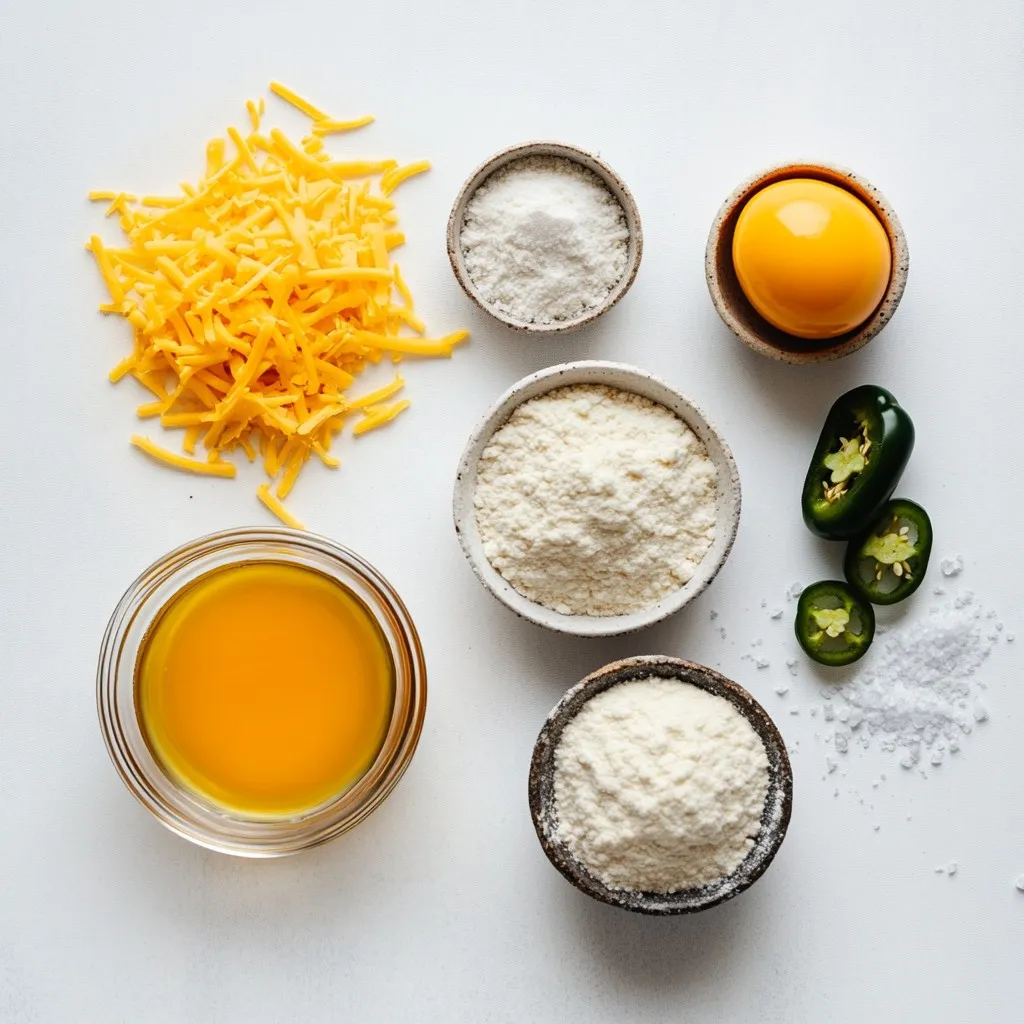
List of Primary Ingredients
– 2 cups warm water (110°F / 43°C)
– 1 packet (2 ¼ teaspoons) active dry yeast
– 2 tablespoons granulated sugar
– 5 cups all-purpose flour
– 1 tablespoon salt
Key Fillings
– 1 cup sharp cheddar cheese, shredded
– 2-3 jalapeños, finely chopped (with seeds removed for milder heat)
Additional Ingredients for Cooking
– ½ cup baking soda
– 1 large egg (beaten for egg wash)
– Coarse sea salt for sprinkling
Gathering the right ingredients is key to making the best Jalapeño Cheddar Stuffed Pretzels. The warm water activates the yeast, making the dough rise. Yeast is a living thing; it needs sugar to feed on. The granulated sugar helps this process.
Using high-quality all-purpose flour gives the pretzels their chewy texture. Salt adds flavor and balances the taste. For the filling, I love using sharp cheddar cheese. Its bold flavor pairs well with the spice of jalapeños. Removing the seeds from jalapeños makes them less hot, so you can control the spice level.
When cooking, baking soda is essential. It helps achieve that classic pretzel crust. An egg wash gives the pretzels a nice, golden color when baked. Lastly, sprinkling coarse sea salt on top adds a nice crunch. All these ingredients work together to create a tasty snack you’ll enjoy!
Step-by-Step Instructions
Activating the Yeast
– Combine warm water, yeast, and sugar.
– Wait for the mixture to become frothy. This shows the yeast is alive and ready.
Preparing the Dough
– Mix flour and salt in a large bowl.
– Pour in the yeast mixture and stir.
– Form the dough and knead until smooth, about 5-7 minutes. If sticky, add more flour.
Dough Rising Process
– Cover the dough with a damp cloth.
– Let it rise in a warm place for about 1 hour. It should double in size.
Shaping the Pretzels
– Punch the dough down to release air.
– Divide it into 10 equal pieces and roll each into a long rope.
– Flatten each rope, add cheese and jalapeños, then seal and twist into a pretzel shape.
Poaching the Pretzels
– Boil about 10 cups of water and add baking soda.
– Carefully drop each pretzel into the water for about 30 seconds.
– Use a slotted spoon to remove them and let water drain.
Baking the Pretzels
– Preheat your oven to 450°F (230°C) and line baking sheets with parchment paper.
– Brush the tops of the pretzels with beaten egg wash.
– Sprinkle with coarse sea salt and bake for 12-15 minutes until golden brown.
Tips & Tricks
Perfecting the Dough Texture
– Adjusting for stickiness: If your dough is sticky, add a bit more flour. Start with one tablespoon at a time. This will help you get a nice, smooth texture.
– Kneading techniques for elasticity: Knead the dough for about 5-7 minutes. Use the heel of your hand to push the dough away, then fold it back. This helps develop gluten, giving the dough its stretch.
Enhancing Flavor and Presentation
– Choosing the right cheese: Use sharp cheddar for a bold flavor. It melts well and pairs perfectly with jalapeños, making each bite exciting.
– Use of spices or herbs for added flavor: Consider adding garlic powder or onion powder to the dough. Dried herbs like oregano can also add depth to the taste.
Serving Suggestions
– Best dips to accompany: Serve these pretzels with spicy mustard or a creamy cheese dip. Both options enhance the flavor and make for a fun snack.
– Ideal presentation ideas: Place the pretzels on a rustic wooden board. Add a small bowl of dip in the center. It makes for a beautiful and inviting display.
Pro Tips
- Yeast Activation: Make sure the water is warm but not too hot; if it’s above 120°F (49°C), it may kill the yeast and prevent the dough from rising.
- Jalapeño Selection: For a milder flavor, remove the seeds and membranes of the jalapeños before chopping. For extra heat, keep them intact!
- Twisting Technique: When shaping the pretzels, ensure the ends are twisted tightly to prevent them from unraveling during boiling and baking.
- Perfect Baking: Keep an eye on the pretzels while baking. Ovens can vary, so check for that golden-brown color to ensure they’re perfectly done.
Variations
Cheese Variations
You can switch up the cheese in your pretzels. Try using mozzarella for a stretchier bite. A creamy goat cheese can add a tangy twist. Mixing different cheeses boosts the taste. A blend of sharp cheddar and pepper jack adds a kick.
Spice Level Adjustments
You can control the heat by using different jalapeños. For milder bites, use fewer seeds. If you love spice, try serrano peppers instead. Adding smoked paprika or cayenne can also turn up the heat. Experimenting with spices keeps things fun.
Alternative Dough Options
Want a healthier twist? Use whole wheat flour for a nutty flavor. If you need gluten-free options, almond flour works well. You can also infuse your dough with herbs like rosemary or thyme. This adds a fragrant touch that elevates your pretzels.
Storage Info
Short-Term Storage
To keep your pretzels fresh, store them in an airtight container. This helps keep them soft. You can keep them at room temperature for one to two days. If you want to keep them longer, try refrigeration. However, this may change their texture.
Long-Term Storage
For long-term storage, freezing is the best option. Wrap each pretzel in plastic wrap. Then, place them in a freezer bag. They can last up to three months. When you’re ready to eat them, thaw them in the fridge overnight.
To reheat, preheat your oven to 350°F (175°C). Place the pretzels on a baking sheet and heat for about 10-12 minutes. This keeps them crispy and warm.
Serving After Storage
When it’s time to serve, warming is key. Use the oven for the best taste. If you want a quick option, microwave them for 20-30 seconds. However, the oven gives a better texture.
Serve your pretzels with spicy mustard or cheese dip for a tasty treat!
FAQs
How long does it take to make Jalapeño Cheddar Stuffed Pretzels?
It takes about 1 hour and 40 minutes to make these pretzels. You’ll spend about 20 minutes on prep. Then, let the dough rise for 1 hour. After that, baking takes around 12 to 15 minutes. Just enjoy the process!
Can I make the dough ahead of time?
Yes, you can make the dough ahead. Prepare it and let it rise. After rising, cover it tightly with plastic wrap. Store it in the fridge for up to 24 hours. When ready, let it come to room temperature before shaping.
What can I serve with Jalapeño Cheddar Stuffed Pretzels?
These pretzels pair well with many dips. I recommend tangy spicy mustard or creamy cheese dip. You can also try salsa or guacamole. Fresh veggies on the side add a nice crunch!
Are there gluten-free options for this recipe?
Absolutely! You can use gluten-free flour blends. Look for ones that work well for baking. Make sure to check the package for measurements. This way, you can enjoy the same delicious taste without gluten!
You now know how to make Jalapeño Cheddar Stuffed Pretzels from start to finish. We covered the key ingredients, step-by-step instructions, and expert tips for perfecting your dough. You learned about variations and storage info for your pretzels too.
Final thoughts: Pretzels are not just a snack; they can be a fun meal. Get creative with fillings and spices. Enjoy your tasty treats fresh, or store them for later. Happy bakin