Are you ready to make a delightful treat for the holidays? Chocolate Peppermint Fudge is an irresistible gift that everyone loves. This easy recipe combines rich chocolate and refreshing mint, creating a festive flavor that feels special. I’ll guide you through every step, from gathering ingredients to storing your tasty fudge. Let’s turn your kitchen into a holiday wonderland with this sweet delight!
Why I Love This Recipe
- Festive Flavor: The combination of rich chocolate and refreshing peppermint creates a perfect holiday treat that everyone enjoys.
- Easy to Make: This fudge requires minimal ingredients and just a few simple steps, making it a breeze for even novice bakers.
- Customizable: You can easily add your favorite toppings or mix-ins, such as nuts or different types of chocolate, to make it your own.
- Gift-Worthy: Cut the fudge into squares and package them beautifully for a thoughtful homemade gift during the holiday season.
Ingredients
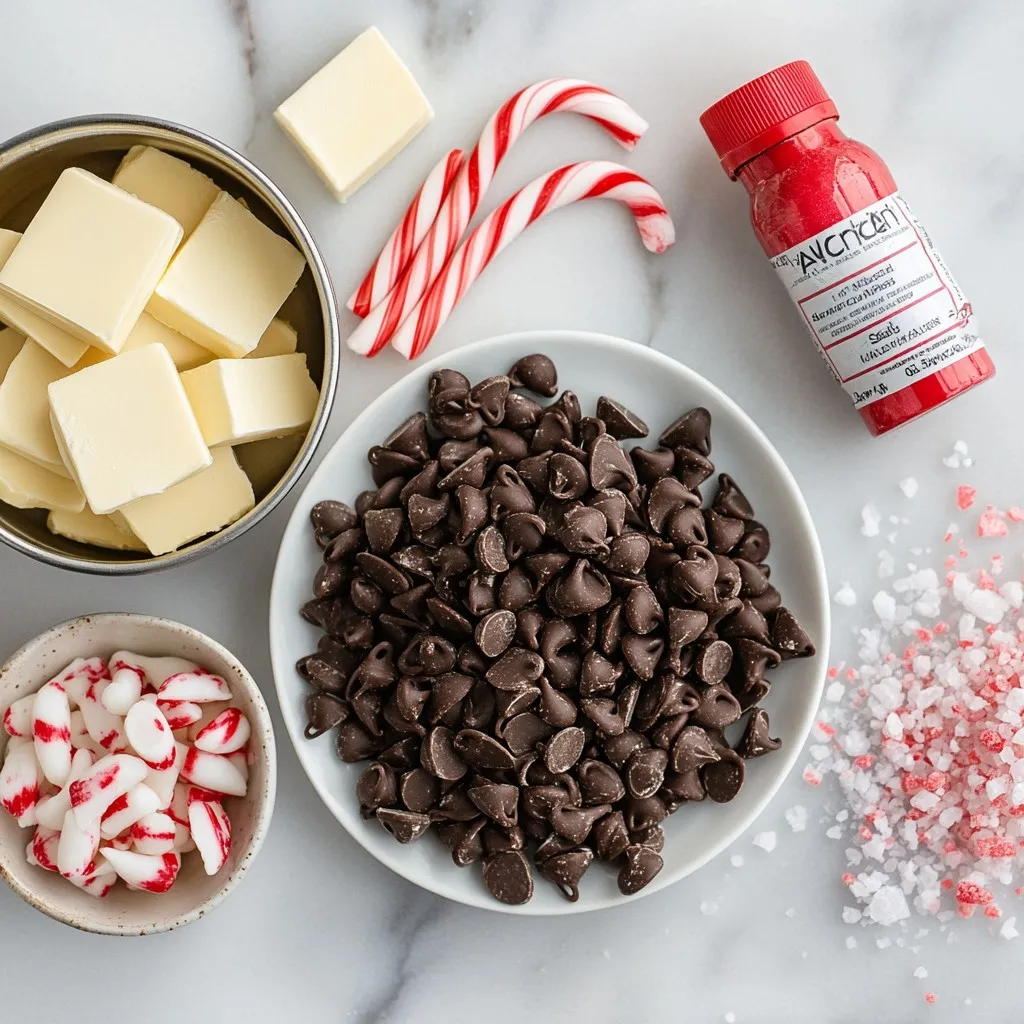
List of Ingredients
– 2 cups semisweet chocolate chips
– 1 cup sweetened condensed milk
– 1/4 cup unsalted butter, cut into small pieces
– 1 teaspoon peppermint extract
– 1/4 teaspoon salt
– 1/2 cup crushed candy canes (plus extra for garnish)
– 1/2 cup white chocolate chips (optional, for drizzling)
Measurement Guide
When making Chocolate Peppermint Fudge, accurate measurements matter. Use standard measuring cups and spoons. For the chocolate chips, fill the cup to the top and level it off. For butter, cut it into small pieces before measuring. This helps it melt evenly. Use a teaspoon for the peppermint extract and salt. These small amounts can change the flavor.
Ingredient Substitutions
You can swap some ingredients if needed. Use dark chocolate chips if you like a richer flavor. If you don’t have sweetened condensed milk, use evaporated milk with sugar. For a dairy-free version, use plant-based butter. Leave out the white chocolate if you want a simpler fudge. If you prefer a different mint flavor, use mint extract instead of peppermint.
Step-by-Step Instructions
Preparing the Baking Pan
Start with an 8×8 inch baking pan. Line it with parchment paper. Make sure the paper hangs over the edges. This helps later when you lift out the fudge.
Melting the Chocolate Mixture
Grab a medium saucepan. Add the semisweet chocolate chips, sweetened condensed milk, and butter pieces. Place the saucepan on low heat. Stir this mixture for 5-7 minutes. Keep stirring until it melts and looks smooth. It should be glossy and thick.
Combining Flavors and Mixing
Take the saucepan off the heat. Pour in the peppermint extract and salt. Stir well to mix everything together. Now, gently fold in the crushed candy canes. This adds a nice crunch and festive taste.
Next, pour the mixture into your prepared pan. Use a spatula to spread it out. Smooth the top so it looks nice. If you want to use white chocolate, melt it in a bowl. Heat it in 30-second bursts in the microwave. Stir until it’s smooth. Drizzle this white chocolate over the fudge for a pretty design.
Finally, sprinkle more crushed candy canes on top for extra flair. Put the pan in the fridge for at least 2 hours. Wait until it feels firm. After it sets, lift the fudge out using the parchment paper. Cut it into squares and enjoy!
Tips & Tricks
Achieving the Perfect Fudge Texture
To get the best fudge texture, use low heat when melting. High heat can burn the chocolate. Stir often to keep it smooth. The mixture should be shiny and thick. If it seems too soft, let it cool a bit before pouring it into the pan. Cooling helps it set better.
Avoiding Common Mistakes
One common mistake is not measuring ingredients correctly. Use a kitchen scale for chocolate and butter for best results. Another mistake is not mixing well. Every scoop should have an even mix of chocolate and candy canes. If you skip the salt, the fudge will taste flat. Always include it for flavor balance.
Decorating for Presentation
To make your fudge look special, drizzle melted white chocolate on top. This adds a nice touch. Use a fork to create wavy lines. Then, sprinkle more crushed candy canes over the top. This gives a festive look and crunch. Arrange the fudge on a colorful plate to impress your guests.
Pro Tips
- Use High-Quality Chocolate: The flavor of your fudge heavily relies on the quality of the chocolate you use. Opt for premium semisweet chocolate chips for a richer taste.
- Chill for Perfect Texture: Allow the fudge to set in the refrigerator for at least 2 hours. This ensures a firm texture that holds its shape beautifully when cut.
- Customize Your Toppings: Feel free to get creative with toppings beyond crushed candy canes. Consider adding chopped nuts, sprinkles, or even drizzles of caramel for a unique twist.
- Store Properly: Keep your fudge in an airtight container at room temperature for up to a week, or refrigerate it for longer freshness. Just ensure it’s well-wrapped to maintain its flavor.
Variations
Alternative Flavor Combinations
You can switch up flavors for fun. Try using dark chocolate instead of semisweet. This gives a richer taste. You can also add orange zest for a nice citrus twist. For a more unique twist, mix in almond extract. You can even try adding a touch of espresso for a coffee kick. The fun part is that you can mix and match flavors to find your favorite.
Dietary Adjustments (vegan, gluten-free)
Making this fudge vegan is easy. Use dairy-free chocolate chips and coconut milk instead of sweetened condensed milk. You can use a vegan butter substitute to keep the taste rich. For gluten-free options, check that your chocolate chips are gluten-free. This fudge can be enjoyed by everyone with these small changes.
Additional Toppings
Toppings can make your fudge even better. You can add chopped nuts for some crunch. Try walnuts, pecans, or hazelnuts. Drizzle caramel sauce for a sweet touch. You can also sprinkle sea salt for a nice contrast. Get creative! Use different candies or even mini marshmallows. These toppings add flavor and make your fudge look festive.
Storage Info
Best Practices for Storing Fudge
Store your chocolate peppermint fudge in an airtight container. Use wax paper between layers to prevent sticking. Keep the fudge in a cool, dry place, away from heat and sunlight. This will help maintain its creamy texture and rich flavors.
How Long Does it Last?
When stored properly, the fudge lasts about two weeks. If you keep it in the fridge, it can last up to three weeks. Always check for any signs of spoilage before eating. The flavors may change slightly over time, but it should still taste great.
Freezing Instructions
To freeze your fudge, cut it into squares first. Wrap each piece tightly in plastic wrap. Then, place the wrapped fudge in a freezer-safe bag or container. It can last for up to three months in the freezer. When you’re ready to enjoy it, let it thaw in the fridge overnight.
FAQs
Can I use milk chocolate instead of semisweet?
Yes, you can use milk chocolate. It will make your fudge sweeter. The texture will be creamier, but it will still taste great. Just keep in mind that the peppermint flavor may stand out more.
How can I make my fudge firmer?
To firm up your fudge, add more chocolate chips. Use a higher ratio of chocolate to condensed milk. You can also chill it longer in the fridge. Some people prefer to add a bit of powdered sugar, too.
Can I make Chocolate Peppermint Fudge without peppermint extract?
Sure, you can skip the peppermint extract. Your fudge will taste more like chocolate. You can try other flavors like vanilla or almond for a different twist. Just remember that peppermint gives it that holiday cheer.
What type of candy canes are best for this recipe?
Use regular candy canes for a classic touch. Crush them into small pieces to add great crunch. You can also try flavored candy canes, like chocolate or strawberry, for a fun twist.
This blog post shows you how to make fudge step by step. You learned about ingredients needed, tips for perfect texture, and fun ways to switch up flavors. Remember to store your fudge properly for the best taste. You can try new toppings or make it vegan or gluten-free. Now, go ahead and impress your friends and family with your fudge-making skills! Enjoy the sweet rewards of your efforts and have fun experimenting with new creation